

Part 2 of our series on using your own photos for small business marketing.
In the first article of this series, Marketing on a Budget: Using Your Own Photos, we looked at how to build your own business photo library using a smartphone or camera.
Now it’s time to put those photos to work.
With one good photo and a free Canva account, you can create professional-looking marketing materials for your website, social media, printed displays, and even office wall art.
In this tutorial, I’ll show you how I turned one beach photo into a printable motivational poster. Once you understand the process, you can use the same steps to create Pinterest Pins, Instagram posts, Facebook graphics, blog headers, newsletters, and much more.
Step 1 – Open Canva
Log in to Canva and click Create a design. Click the + tab on your right (I’m using a PC)
The easiest way to start is by searching for the type of design you want to create.
For example:
- Poster (or the equivalent in your language, such as Plakat in Norwegian)
- Pinterest Pin
- Instagram Post
- Facebook Post
- Flyer
- Presentation
- Blog Banner
One of Canva’s biggest advantages is that it automatically opens the correct canvas size, so you don’t have to remember image dimensions.
Step 2 – Choose a Template or Start from Scratch
Canva offers thousands of professionally designed templates.
The free version includes a large selection of templates, fonts, and photos, while Canva Pro gives you access to even more premium content and advanced tools.
If you regularly create marketing materials, Pinterest Pins, Instagram graphics, or blog content, Canva Pro can be a worthwhile investment. The additional templates, Brand Kit, Magic Resize, and premium photo library can save a lot of time.
Whether you use the free or paid version, the overall workflow is very similar.
Step 3 – Upload Your Own Photo
Click Uploads and upload the photo you’d like to use.
Drag the image onto your design and resize it until it fills the page.
Using your own photos helps create a more personal and recognizable brand while avoiding copyright concerns.
Note: The thumbnails shown here are simply my most recently used Canva images. Your library will, of course, look different.

Once your photo has finished uploading, you have two easy ways to add it to your design.
- Double-click the uploaded image, and Canva will automatically place it onto your canvas.
- Or, click and drag the image onto your design area. This gives you more control over where you place it, especially if you’re working with multiple photos or design elements.
If needed, you can resize or reposition the image by dragging the corner handles until you’re happy with the layout.

💡 Tip for Canva users:
Canva’s interface may look slightly different depending on your language and updates. If you can’t find your own photo, make sure you’re viewing your uploaded images rather than Canva’s built-in photo library.
If you’re using Canva in English:
Uploads
Your own photos and files Images you’ve uploaded from your computer or phone The best choice when creating personalized marketing materials using your own photography
Photos
Canva’s built-in photo library Includes both free and Pro images Great if you don’t have your own photo
If you’re following this tutorial with one of your own photos, make sure you select Uploads rather than Photos.
Step 4 – Add your text
Click Text and choose a heading.
Add your quote, business message, or promotional text.
Experiment with different fonts, sizes, and colors until you’re happy with the overall design.
Simple layouts are often the most effective.
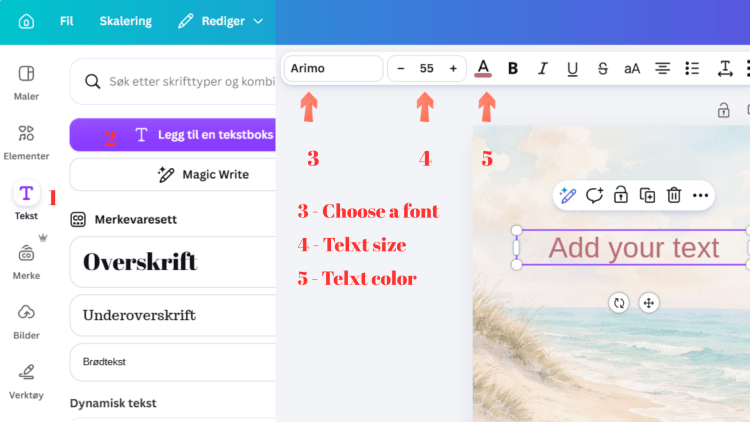
Position your text where it looks best within your design. Don’t be afraid to combine different fonts to create contrast and visual interest. A common design tip is to use an odd number of design elements, as this often results in a more balanced and appealing layout. For example, try using 1, 3, or 5 lines of text.
Step 5 – Download Your Design
When your design is finished, click Share and then Download.
If you’re printing your design, choose PDF Print for the best quality.
PDF Print produces sharper text and higher-quality images than standard image files and is the preferred option for most professional print jobs.
If you’re creating graphics for social media instead, PNG is usually the better choice.

The Same Process Works for Almost Everything
Once you’ve created one design, you can repeat exactly the same workflow for almost any marketing material.
Simply search for the type of project you want to create in Canva, choose a suitable template, upload your own photo, add your text, and download the finished design.
Popular Canva projects include:
- Pinterest Pins
- Instagram Posts
- Instagram Stories
- Facebook Posts
- Blog Banners
- Flyers
- Presentations
- Posters
- Newsletters
- Invitations
- Business Cards
The process stays almost identical—only the canvas size and template change.
Print Your Design
If you’re creating wall art or printed marketing materials, consider using:
- Premium Matte paper for elegant wall prints
- Heavy Matte paper for framed posters
- Photo paper for vibrant photography
- Canvas prints for reception areas and offices
For larger prints, a professional print shop will usually provide the best results.
Templates or Create Your Own?
One of Canva’s biggest strengths is its extensive template library. If you’re new to Canva, starting with a professionally designed template can save time and help you learn how different elements work together.
Simply search for the type of project you want to create—such as a Pinterest Pin, Instagram Post, Flyer, or Poster (or the equivalent term in your language, for example Plakat in Norwegian)—and Canva will display hundreds of ready-made designs.
However, you don’t have to use a template.
If you enjoy designing or already have a clear vision, you can also start with a blank canvas in the correct size. This gives you complete creative freedom to choose your own layout, fonts, colors, and image placement.
Many experienced Canva users begin with the correct canvas size and build their designs from scratch, while others customize an existing template. There is no right or wrong approach—the best option is the one that fits your workflow.
Best Canva Sizes
| Purpose | Canva Size |
|---|---|
| Instagram Post | 1080 × 1080 px |
| Instagram Story | 1080 × 1920 px |
| Pinterest Pin | 1000 × 1500 px |
| Facebook Post | 1200 × 630 px |
| Blog Banner | 1600 × 900 px |
| A4 Print | 210 × 297 mm |
| US Letter | 8.5 × 11 in |
| Poster | 11 × 17 in |
| Poster | 18 × 24 in |
| Large Poster | 24 × 36 in |
Save, Print, and Display Your Artwork
Once your design is finished, download it as PDF Print for the best printing quality.
For home printing, choose a good-quality matte paper or photo paper and use your printer’s highest quality setting whenever possible.
If you’re printing larger wall art, consider using a local or online print shop. They can often produce sharper prints on heavier paper or canvas at a very reasonable price.
Frame your finished print and display it in your office, reception area, waiting room, salon, or workspace to create a more welcoming and professional environment.
Download My Free Inspirational Wall Art
Looking for ready-made office artwork?
Download my free Inspirational Wall Art Bundle featuring professionally designed printable quotes for offices, salons, waiting rooms, and home workspaces. Simply download, print, frame, and enjoy.
👉 Download the Free Inspirational Wall Art Bundle
Visit our photo business collection

